I was watching this video from freeCodeCamp and it was really great! Helped me understand a lot. I did forget a lot of the stuff in it so I decided to make notes and publish them on this blog instead.
All credits of the content to CodeLab and freeCodeCamp. This post just gives away my understanding of this video while teaching the readers, what DOM manipulation is – for those who seek text-based learning.
Here’s the video if you’re wondering:
Table Of Contents
- What is DOM?
- How to select elements in the DOM?
- How to traverse the DOM?
- How to Manipulate the DOM?
- Event Handling
What is DOM?
DOM is the document object model. It has many built-in properties we can use to access HTML/CSS and manipulate it with the help of JavaScript.
You can manipulate content, style, and structure with DOM.
DOM Tree
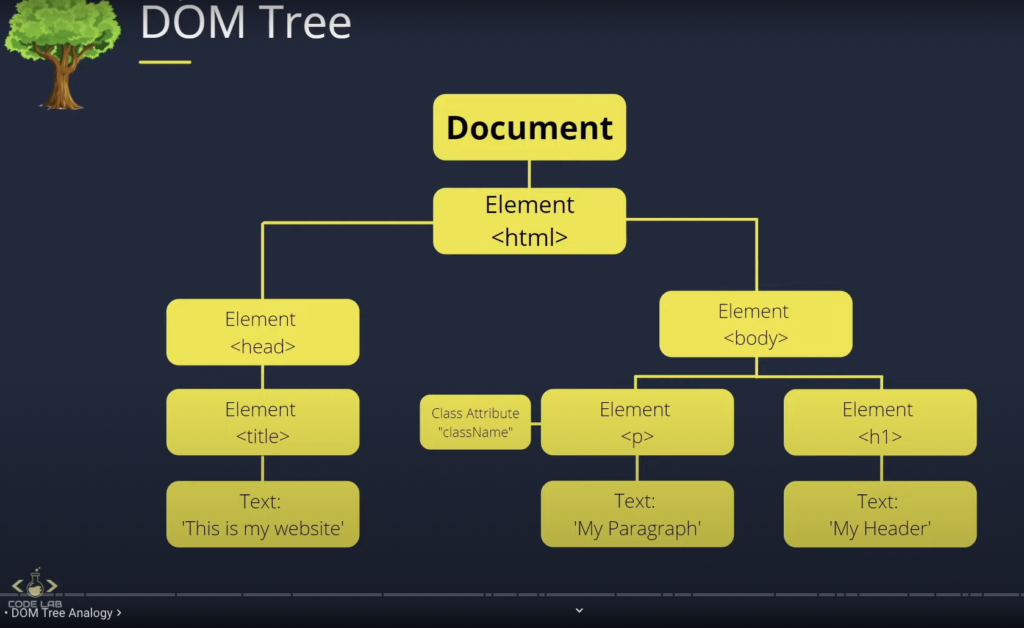
Document: Root node, used to manipulate everything inside the DOM
<HTML>: Parent to <head> and <body> and child to Document.
<HTML> & <body>: Siblings to each other
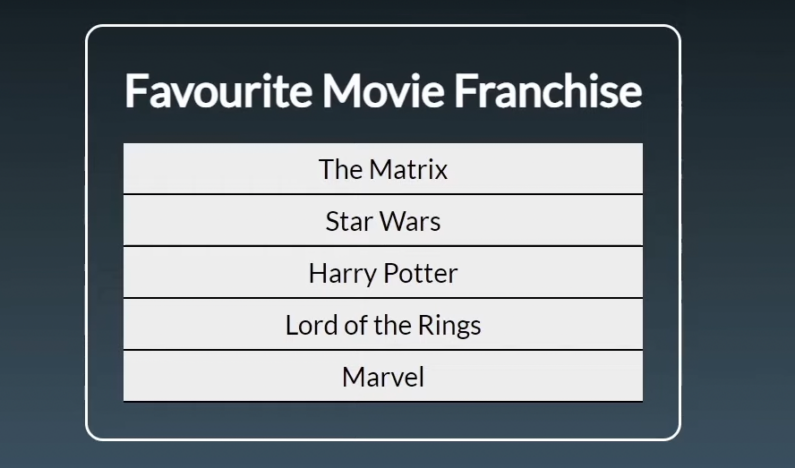
What are we manipulating?
Here’s the layout we will be testing things on.
<html>
<head>
<meta http-equiv= X-UA-Compatible content="IE=edge">
<meta name="viewport" content="width=device-width, initial-scale=1.0">
<title>Master DOM Manipulation: Part 1</title>
<style>
</style>
</head>
<body>

 <div class="container">
   <h1 id="main-heading">Favourite Movie Franchise</h1>
   <ul>
     <li class="list-items"›The Matrix</li>
     <li class="list-items"›Star Wars</li>
     <li class="list-items" ›Harry Potter</li>
     <li class="list-items"> Lord of the Rings</li>
     <li class= "list-items"'› Marvel</li>
   </ul>
 </div>

<script src="app.js"></script>
</body>
</html>
To manipulate the DOM, you need to select an element.
There are multiple ways of selecting an element.
The easiest and most commonly used is querySelector() and querySelectorAll()
Let’s have a look at ways you can select an element in DOM –
Selecting Elements in DOM
getElementById()
document.getElementById('main-heading')Now we can place this inside a variable and then we access the variable to manipulate it.
const title = document.getElementById('main-heading')

title.style.color = 'red'
getElementsByClassName()
const listItem = document.getElementsByClassName('list-items')This returns an Array-like object and not a single object. This is why we can’t directly apply styles and stuff to this one.
getElementsByTagName()
const listItem = document.getElementsByTagName('li')This also returns an Array-like object and not a single object. This is why we can’t directly apply styles and stuff to this one.
querySelector()
This element selects the first element of any specified element. For example, there are 10 elements with the same class name. This will pick the 1st one of those 10.
We can use CSS selectors to select elements using this method. This is what makes it really easy to select elements here.
const container = document.querySelector('div')querySelectorAll()
This will select all of the elements with a pick in that HTML file.
For example, we have two divs in our HTML file, this will pick both of them and when we console.log() the variable, we’ll see a NodeList presented to us. It’s like an Array that has all our divs selected listen in an Array-like format.
const container = document.querySelector('div')Styling an element with DOM
Let’s say we want to style the heading element
const title = document.querySelector('#main-heading')

title.style.color = 'red'
Here, we first select the variable we want to manipulate. Selecting the ‘title’ variable lets us manipulate the title / the heading as we have selected that query in JS.
There’s a catch
This is an inline styling and this won’t work when you apply it in a class.
Let’s see
const listItems = document.querySelector('.list-items')

listItems.style.color = 'red'
This code wouldn’t work and give us an error.
Why?
The reason is that we can’t apply an inline style to five different list items.
What’s the solution? Are there any workarounds?
YES.
We have to create a loop and loop through every element and individually apply styling to each (with the help of a loop of course)
for(i = 0; i < listItems.length, i++) {
  listItems[i].style.color = 'red'
}
Creating, Adding, Modifying Elements with DOM
For example, we want to create a list item in our Unordered List
// Creating Elements
const ul = document.querySelector('ul')
const li = document.createElement('li')

// Adding Elements
ul.append(li)

// Modifying the text
li.innerText = 'Xmen'
In the code above:
- We create a ‘ul’ variable and select the unordered list as a whole
- We create a ‘li’ variable, select the list of elements
- We append li to ul and that creates a new li (list item) in the ul (unordered list)
- We modify the text using innerText and add something to the list item.
We can modify text in three ways:
- innerHTML
- textContent
- innerText
In most of the cases, we’ll only use innerText as it’s the safest and easiest to use and understand.
Modifying an Elements Classes & Attributes
Adding Attributes
li.setAttribute('id', 'main-heading')We pick this li element and then pass .setAttribute() to it.
We need to give two inputs here in the parenthesis:
- What type of attribute do you want?
- What will be the name of that attribute?
This will set the id of li to main-heading.
Removing Attributes
li.removeAttribute('id')This removes id from items in li.
Access Attributes
const title = document.querySelector('#main-heading')

console.log(title.getAttribute('id'))
Dealing with Classes
classList property
Adding a class
li.classList.add('list-items')This adds the class list-items to the li element. As easy as it can get.
Removing a class
li.classList.remove('list-items')Check if an element has a class
console.log(li.classList.contains('list-items')This will check if li contains the class list-items.
Remove elements in JavaScript
li.remove();Write down the element you want to remove with .remove()
Traversing in the DOM
Parent Node Traversal
let ul - document.querySelector('ul')

console.log(ul.parentNode)
// OR
console.log(ul.parentElement)
This will log the element which is a parent of ‘ul’
If we want to know the parent of the parent element then just write parentNode OR parentElement again.
let ul - document.querySelector('ul')

console.log(ul.parentNode.parentNode)
// OR
console.log(ul.parentElement.parentElement)
Child Node Traversal
let ul - document.querySelector('ul')

console.log(ul.childNodes)
first and last child nodes
let ul - document.querySelector('ul')

console.log(ul.firstChild)
console.log(ul.lastChild)
Children Elements
console.log(ul.children)This prints the 5 list items inside the UL
You can also access first and last child elements
console.log(ul.firstElementChild)
console.log(ul.lastElementChild)
Sibling Node Traversal
console.log(ul.previousSibling)
console.log(ul.nextSibling)
Event Listeners
Even listeners help increase the intractability of the page by listening to different events that happen on the page. This can be click on a button, hovering over an element etc etc.
Syntax
element.addEventListener('click', function)We have two parameters here – click and function. A click is an event and function is a function that will execute when this even takes place.
Example 1: Button alerts when we click on it
// Create a variable and select the query

const button = document.querySelector('.btn')

// Create a function that creates an alert

function createAlert() {
  alert('I love JavaScript')
}

// Create an event listener

button.addEventListener('click', createAlert)
Example 2: The background color of a box changes when we hover our mouse cursor on it
// Create a variable and select a query

const boxTest = document.querySelector('.box-1')

// Create a function that changes background color of the box

function boxColorChange() {
  boxTest.style.backgroundColor = 'blue'
}

// Create an event listener

boxTest.addEventListener('mouseover', boxColorChange)
How to create a reveal/hide functionality with JavaScript?
// Reveal Event
const revealBtn = document.querySelector("reveal-btn");

cost hiddenContent = document.querySelector("hidden-content");

function revealContent() {
  if (hiddenContent.classList.contains("reveal-btn")){
    hiddenContent.classList.remove("reveal-btn")
  } else {
    hiddenContent.classList.add("reveal-btn")
  }
}

revealBtn.addEventListener("click", revealContent);